All Categories
Featured
Table of Contents
- – Rv Repair And Service Near Me Riverside, CA
- – OCRV Center
- – Rv Repair In My Area Riverside, CA
- – Rv Delamination Repair Near Me Riverside, CA
- – Rv Repair Services Near Me Riverside, CA
- – Full Service Rv Repair Near Me Riverside, CA
- – Motorhome Awning Repair Riverside, CA
- – Rv Plumbing Repair Near Me Riverside, CA
- – Motorhome Repair Near Me Riverside, CA
- – Rv Delamination Repair Near Me Riverside, CA
- – Rv Service And Repair Near Me Riverside, CA
- – OCRV Center
Rv Repair And Service Near Me Riverside, CA
For more in-depth questions regarding what I offer, have a look at my website frequently asked question section for response to usual inquiries. The track record of my business prolongs beyond the city limits approximately a 40-mile distance, as lots of customers from surrounding locations trust me with their RV repair services. Amsterdam, NYCooperstown, NYGlen Community, NYJohnstown, NYJohnstown Community, NYTribes Hillside, NY Brian's recreational vehicle Repair service and Service is dedicated to delivering exceptional results for all client needs.
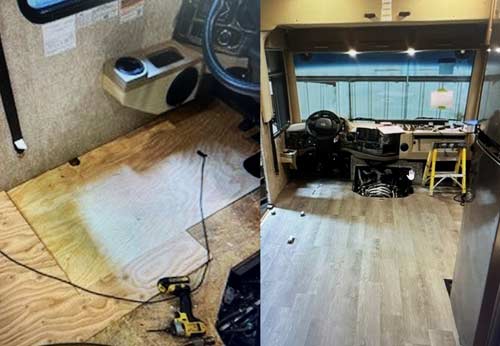
Among things I found out when I was taking all the various other stuff out of the inside of the camper, however, exists are some punky areas in the flooring. One I can reveal you right below. And this, take a look at simply with hand pressure, check out what's taking place there.
And it's not an unusual issue around the door. The various other one is up here at the nose of the trailer. I'll reveal you that when we obtain inside. What I'm after on this next step is to get the negative places out, and after that figure out what it's gon na take to get brand-new audio substrate in there.
That's not typical. And if I pull a little bit, I can feel that the deck, the below floor under the linol, under the linoleum, easy for me to say, is punky. So the goal with this is gon na be to obtain the bad things out up until we return to sound material and afterwards spot that in.
Rv Repair In My Area Riverside, CA
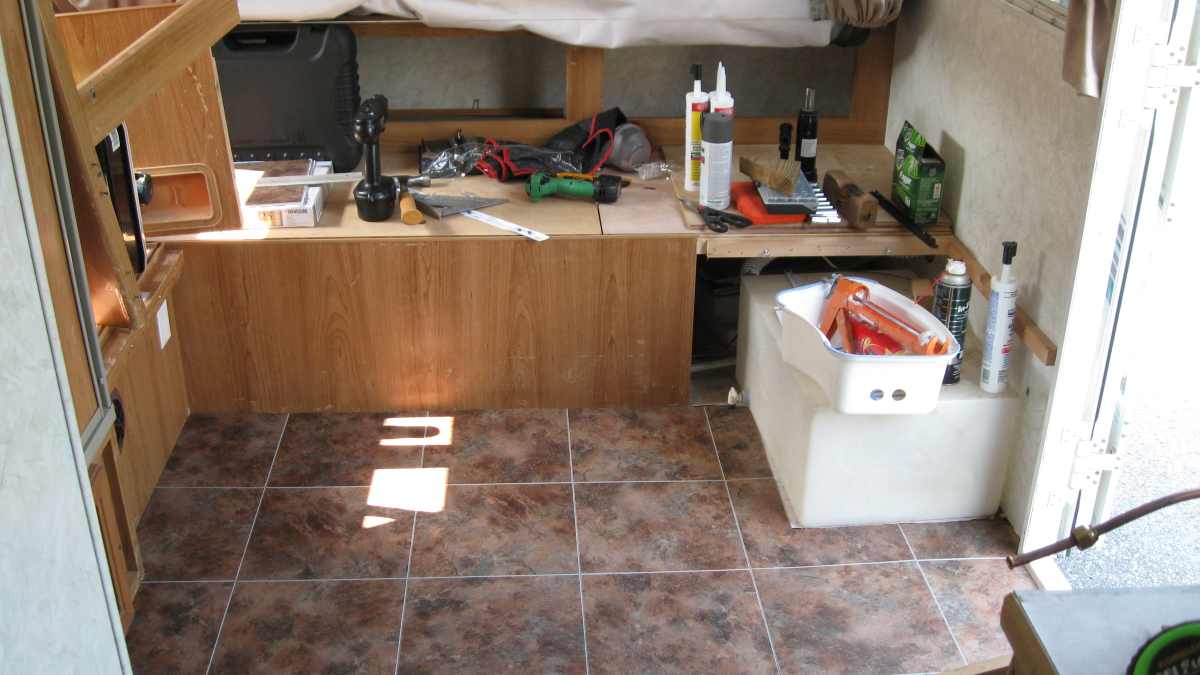
So initially I was considering this and I, you understand, I want to not take anything out I do not have to, but that's gon na be an instance where in order to work about in right here, it's gon na be easier to just take the tank out than to maintain working around it.
I think someone's already done this. And that brings to the head, the inquiry of we can repair the floor, however what triggered the trouble, and below in the front of the trailer, I truly think it had to do with that safe and clean storage tank, due to the fact that it looked like the leak originated over there, and that's what influenced all the floor covering on the substrate, on the nose over right here.
I have actually done some jabbing about on the net, and it looks like near doors that's a common trouble, that makes sense. I understand all it takes is the door obtaining left open. That being said, as soon as the floor is out, we'll have an appearance at that and see, do we require to do some brand-new caulking on the door or something like that to make sure that does not occur again.
And following point is getting that storage tank out. When I speak about the floor misbehaving, certainly what I mean is the subfloor. What we're seeing right here is that we've got linoleum, which would have been the original floor in the camper. There's in fact a little item of rug left in the back room where those 3 bunks were.
Rv Delamination Repair Near Me Riverside, CA
The proprietor before me put in the plastic, so I'm gon na peel off that out and I am gon na save it. I'm gon na attempt to not take all of the flooring out. If we can salvage that, why waste it? And if maybe if it's caught in pattern as well, I can match it back in to come back and refloor everything.
There you go. And child, at very first blush, now I don't wan na jinx myself below, yet I'm liking what I'm seeing right here, which is that this corner is clearly negative. You understand, just also by the noise you can tell that this is gross and punky, and certainly, if I start picking away at it, it comes with me, which it should not.
So um, cautious positive outlook will certainly be the buzzword here. I'm gon na obtain all this linoleum out. I'm gon na obtain the plastic back past the edge of the door, and after that really have an excellent consider how points look. I have actually obtained the linoleum, the old linoleum out, and all of that vinyl click floor is out of here.
Rv Repair Services Near Me Riverside, CA
Up below in this edge it's punky. It's soft enough that I believe with a hammer and a level bar, I can start tearing some plywood out of there. And what that bit exploratory surgical procedure is gon na do is offer me a feel for what the system resembles, which will certainly after that tell me, you know, I assume at some factor right here, gon na finish up running a round saw, and cutting down to good wood and after that changing the negative things.
So like I claimed, I think I can, I can peel off sufficient of the negative stuff out of there to at the very least obtain a feeling for what I have. Well, honestly, where I'm at that promptly suffices to offer me an excellent feel for figuring out what I need to do following.
We can change that as we obtain the new flooring in below also. What this will allow me do, seeing this, I think what I can do following is get a circ saw cut back right here someplace, and after that peel off back to that point. So we'll go from there and simply maintain, like I stated earlier, taking a bad floor out until we reach solid things.
Full Service Rv Repair Near Me Riverside, CA
Currently it's feasible that this is gon na end up being type of L-shape, because in the facility of the camper over here, that floor appears pretty good, however obviously that negative spot is still there by the door, and this has to come out. So presently my program is reducing to a joist right here someplace to obtain to solid wood.
Currently, the other point I wan na state is this. When I took that very first chunk of plywood out, I did that reducing and I eliminated the product, and I realized rather fast, I should've had a mask on. There's a lot going on there. If absolutely nothing else, I'm creating a great deal of dust in a constrained location, so mask.
Motorhome Awning Repair Riverside, CA
So the lower line is it's gross. So from right here on out, it's gon na be a mask for me. And really when you're doing this kind of dusty tear out in your camper, you really wan na secure your nose much like you're protecting your eyes and your hearing. So my program is enter here and tear plywood out, and with any luck the following time you have to check out this we're considering the solid timber parts, so we understand what sort of replacement I need to do.
Among the things I do want to direct out, I'm being actually careful functioning around the membrane layer that's under the floor. And the factor is the membrane layer is in fact still undamaged, and I do not want to unexpectedly get my foot in the incorrect place and action through it or something and placed a big tear in it.
I'm actually thoroughly functioning around this by walking just on the joists, the sleepers, and after that also just being really, really careful regarding where I step and where I put electronic cameras and stuff. Below's where I'm at. On this outside of the camper, one of things that's really great news is that home plates under of the wall surfaces are done in actually good condition, which truthfully surprised me for the condition of every little thing else in right here.
On this specific wall, the joist, the last rim piece that's out here outside of the camper is still there and it's in great shape. The problem I'm up versus is that if I don't sister something alongside it here, when I come in with plywood, I won't have anything to nail the plywood to.
Rv Plumbing Repair Near Me Riverside, CA
Simple stuff. I suggest, all I'm doing is obtaining it in location, and after that I'm going with screws for every little thing instead than nails simply to see to it I obtain an excellent bite, and it stays stuck once it remains in there. And even more of the exact same. I'm simply going to drive screw after screw after screw to secure these components together and ensure they remain stuck.
I'm obtaining that edge item in. And one of things to be observant of is that as a result of the skin outside of the trailer, I can not get fasteners through this, the board we just placed in and tie it into that. So rather I am making use of angle irons here.
Talk a lot more concerning that. But among the important things, one of things also, that I desired to discuss is that I did a button, a screw button, after I got going on that particular first item, I was adding back in. I understood that those screws I was using were no place near beefy sufficient for what we were asking of them.
Now with these, what that angle iron will certainly do is connect these two items together. And after that the other thing to bear in mind below is that when the deck comes on, once plywood begins, which overlays these pieces and all, and gets secured to them, that also is mosting likely to assist connect everything to make sure that it ties these parts together.
Motorhome Repair Near Me Riverside, CA
So the angle iron plus the plywood is gon na help with that. And there's absolutely nothing, nothing funky about these. Equipment shop things which effect chauffeur, vroom, vroom. That's why I maintain my hearing security in, even when all I'm doing is driving screws. It's loud anyhow. And in a restricted setting like this, you understand, once again, we want to be security aware throughout this.
And the factor for that is I made use of a jigsaw, portable jigsaw, and I cut them back and they're not always cut back yet to the point where I go to great timber, and I'm gon na link right into them. We'll get right into that. Yet what I wished to do was reduced where I understood the ends were poor, and I required to supply some clearance to make it very easy to obtain that rim item in.
The next action is going to be begin bringing those sleepers, the flooring joists back in, and after that from there insulation and plywood. Much more floor, floor, floors are us.
Rv Delamination Repair Near Me Riverside, CA
And I have a staple weapon and I might staple it, yet I seemed like I want something on that particular that I understand is gon na be a bit much more durable connection is, is most definitely gon na maintain that material tight. So right here's my plan keeping that. I've got a table saw in the building, and we'll speak a lot more concerning tools here in simply a second.
And I think it's truly vital that this is treated because it's going to live outside under the camper, not inside the camper. Making use of the table saw I tore that into fifty percent inch thick strips (Rv Repair Places Near Me Riverside). So these are one and a fifty percent by fifty percent. And certainly the sleepers, the joists are on side.
After that making use of a counter sink in my drill, I've currently pre-drilled these, and I did that so that when I start driving screws, I don't gamble of splitting these. I'm pretty close to the next step, which is crawl beneath there, and drive screws with the pre-drilled openings.
Rv Service And Repair Near Me Riverside, CA
We're obtaining prepared up here. Rv Repair Places Near Me Riverside. So the screws need to additionally be outside to see to it that they're gon na not rust away on you. When you've got these prepared currently, like I said, we can get beneath there, and be some difficult electronic camera job to obtain this for you, but we'll obtain these secured up in position to the base of the sleepers
Rv Generator Repair Riverside, CAFull Service Rv Repair Near Me Riverside, CA
Motorhome Refrigerator Repair Riverside, CA
Motorhome Awning Repair Riverside, CA
Motorhome Awning Repair Riverside, CA
Rv Service And Repair Near Me Riverside, CA
Rv Service And Repair Near Me Riverside, CA
Rv Repair Service Near Me Riverside, CA
Rv Plumbing Repair Near Me Riverside, CA
Rv Repair And Service Near Me Riverside, CA
Full Service Rv Repair Near Me Riverside, CA
Motorhome Repair Near Me Riverside, CA
Rv Mechanics Near Me Riverside, CA
Rv Solar Panel Installation Riverside, CA
Rv Generator Repair Riverside, CA
Rv Delamination Repair Near Me Riverside, CA
Rv Repair Centers Near Me Riverside, CA
Rv Mechanics Near Me Riverside, CA
Rv Plumbing Repair Near Me Riverside, CA
Rv Repair Shops Near My Location Riverside, CA
Motorhome Repair Shops Riverside, CA
Rv Solar Installation Riverside, CA
Motorhome Refrigerator Repair Riverside, CA
Rv Repair Places Near Me Riverside, CA
Motorhome Repair Shops Riverside, CA
Motorhome Generator Repair Near Me Riverside, CA
Rv Repair In My Area Riverside, CA
Rv Solar Panel Installation Riverside, CA
Rv Repair Centers Near Me Riverside, CA
Rv Refrigerator Repair Near Me Riverside, CA
Rv Mechanics Near Me Riverside, CA
Best Rv Repair Near Me Riverside, CA
Rv Floor Repair Near Me Riverside, CA
Rv Repair Centers Near Me Riverside, CA
Motorhome Repair Shops Riverside, CA
Rv Solar Panel Installation Riverside, CA
Motorhome Generator Repair Near Me Riverside, CA
Camper Ac Repair Near Me Riverside, CA
Motorhome Generator Repair Near Me Riverside, CA
Rv Service And Repair Near Me Riverside, CA
Rv Delamination Repair Near Me Riverside, CA
Rv Service Repair Near Me Riverside, CA
Rv Refrigerator Repair Near Me Riverside, CA
Rv Repair Centers Near Me Riverside, CA
Rv Repairs Near Me Riverside, CA
Rv Ceiling Repair Riverside, CA
Rv Solar Panel Installation Riverside, CA
Rv Delamination Repair Near Me Riverside, CA
Rv Service And Repair Near Me Riverside, CA
Rv Solar Panel Installation Riverside, CA
Rv Repair And Service Near Me Riverside, CA
Rv Floor Repair Near Me Riverside, CA
Motorhome Refrigerator Repair Riverside, CA
Rv Repairs Near Me Riverside, CA
Motorhome Service And Repair Near Me Riverside, CA
Rv Generator Repair Riverside, CA
Motorhome Generator Repair Near Me Riverside, CA
Full Service Rv Repair Near Me Riverside, CA
Camper Ac Repair Near Me Riverside, CA
Rv Repair Centers Near Me Riverside, CA
Rv Refrigerator Repair Near Me Riverside, CA
Rv Plumbing Repair Near Me Riverside, CA
Motorhome Repair Service Riverside, CA
Rv Repairs Near Me Riverside, CA
Rv Floor Repair Near Me Riverside, CA
Motorhome Service And Repair Near Me Riverside, CA
Rv Delamination Repair Near Me Riverside, CA
Full Service Rv Repair Near Me Riverside, CA
Motorhome Refrigerator Repair Riverside, CA
Best Rv Repair Near Me Riverside, CA
Rv Repair Centers Near Me Riverside, CA
Rv Repair Shops Near My Location Riverside, CA
Rv Repair Places Near Me Riverside, CA
Motorhome Awning Repair Riverside, CA
Rv Service Repair Near Me Riverside, CA
Motorhome Repair Service Riverside, CA
Motorhome Repair Service Riverside, CA
Motorhome Awning Repair Riverside, CA
Affordable Seo Marketing Company Riverside, CA
Find A Seo Company Near Me Riverside, CA
Rv Repair Places Near Me Riverside, CA
OCRV Center
Table of Contents
- – Rv Repair And Service Near Me Riverside, CA
- – OCRV Center
- – Rv Repair In My Area Riverside, CA
- – Rv Delamination Repair Near Me Riverside, CA
- – Rv Repair Services Near Me Riverside, CA
- – Full Service Rv Repair Near Me Riverside, CA
- – Motorhome Awning Repair Riverside, CA
- – Rv Plumbing Repair Near Me Riverside, CA
- – Motorhome Repair Near Me Riverside, CA
- – Rv Delamination Repair Near Me Riverside, CA
- – Rv Service And Repair Near Me Riverside, CA
- – OCRV Center
Latest Posts
Best Supplemental Insurance For Seniors Tustin
Swamp Cooler Pad Replacement Valley Village
Toluca Lake Swamp Cooler Leak Repair
More
Latest Posts
Best Supplemental Insurance For Seniors Tustin
Swamp Cooler Pad Replacement Valley Village
Toluca Lake Swamp Cooler Leak Repair