All Categories
Featured
Table of Contents
- – Rv Solar Panel Installation La Habra, CA
- – OCRV Center
- – Rv Solar Panel Installation La Habra, CA
- – Rv Repair In My Area La Habra, CA
- – Rv Plumbing Repair Near Me La Habra, CA
- – Rv Generator Repair La Habra, CA
- – Rv Refrigerator Repair Near Me La Habra, CA
- – Rv Repair And Service Near Me La Habra, CA
- – Motorhome Service And Repair Near Me La Habr...
- – Rv Repair In My Area La Habra, CA
- – Motorhome Service And Repair Near Me La Habr...
- – Motorhome Repair Shops La Habra, CA
- – OCRV Center
Rv Solar Panel Installation La Habra, CA
Marvin Braun, proprietor of Accuracy recreational vehicle, is an RVIA/RVDA Master Certified RV Professional and a full-time RVer. He and his partner cope with and use solar energy on a daily basis. Marvin stays up to date with the newest modern technology, including crossbreed inverters and lithium battery systems. He mounts systems on all courses of Recreational vehicles consisting of motor homes, fifth wheels, travel trailers, Airstreams and more.
Do the highest possible high quality workmanship feasible. Offer consumer education and learning on treatment and maintenance of their new solar arrangement. Give the highest possible high quality elements in the industry.

Prior to April of 2018, our only boondocking experience in the very first 20 months of taking a trip the country in our RV, was 3 nights at a state park in Rhode Island, and one night at a truck quit vehicle parking whole lot in Laramie Wyoming. The weekend break spent in George Washington State Park near Providence Rhode Island was invested outside, playing in a lake, taking pleasure in the warm summer season weather, and our only electric needs were for the lights.
The heating system draws a great deal of energy, and running all night would eliminate any type of single 12v battery in an issue of hours. That had not been the minute we chose to obtain more batteries or anything like that, it was simply our only experience with outdoor camping off grid for any kind of quantity of time with our Cyclone.
Rv Solar Panel Installation La Habra, CA
Windy Nation appeared to have the market cornered on Amazon RV Solar, so I chose them. To get the power out of the batteries, I included 2 standalone electrical outlets directly to the inverter, one in the kitchen for our Immediate Pot, and the various other in a very easy area to accessibility for charging and whatever else we needed it for.
Even though the sunlight never establishes in Alaska, we certainly had problem with the 3 panels on the roof since it was cloudy and over cast the majority of the time. Luckily we can charge the batteries a few various ways: Solar panels, when the sun happen to be out Alternator, when the motorhome's engine was running With the aboard generator We took a trip in the Summer season Residence from April 15th to August 25th and in those 4 months I absolutely learned a whole lot concerning powering a recreational vehicle solar off the grid.
Possibly an extra battery (and far better batteries), an additional panel or 2, and be a lot more aware of the dimension and length of wiring I utilized for the various links throughout the system. Generally it was an excellent affordable remedy that worked. The main takeaway from that experience was we did NOT intend to be reliant on 2 isolated outlets; we wanted our recreational vehicle to operate the exact same whether it was plugged in or otherwise.
I was researching panels, inverters, inverter/chargers, charge controllers, batteries, circuitry, breakers, battery monitors, and so on. There is a wide range of info out there, however it was all in some foreign language that chatted in terms of watts, ohms, volts, amps, gauge electrical wiring, crossbreed, aid, bluetooth, Wi-Fi, and the checklist goes on and on!
Rv Repair In My Area La Habra, CA
Yet we have the capability extremely quickly to utilize a great deal of electrical power. When thinking through the process, and what we desired to accomplish with the system, I maintained reflecting to our solar mission statement from the Summer Home, we wanted our motor home to work the very same whether it was connected in or otherwise! My please note: I am wonderful with DC electric systems, yet recognize just enough regarding air conditioning systems to be unsafe.
This blog site is NOT indicated to be an outright source for powering your RV, but even more to document our construct and trip to being energy independent. I discussed above, our 40' toy hauler 5th wheel came from the manufacturing facility with a single 12 volt battery. We had actually changed it in the previous year, and honestly had not really used it for much since we were constantly plugged in.

With that being stated, our 50 amp Recreational vehicle has 2 x 120-volt hotlines going right into the Recreational vehicle's primary A/c distribution panel. It feeds 120 volts of A/c to the essential circuits of the Motor home.
Rv Plumbing Repair Near Me La Habra, CA
Victron Multiplus Inverter/Charger A number of the installs that I was following, all seemed to return to a number of different makers, Magnum and Victron seemed to be leading the method. Numerous of my friends were using Victron elements with a great deal of success and high appreciation, so I selected their tools for the core of the system.
We will certainly get to that later! Lucky for me, a buddy of ours is a Victron Supplier, and I was able to get a bargain on the meat and potatoes of the system. 2 x Victron 12/3000/120 -50 Multiplus Inverter/Chargers These hold true sine wave inverter/chargers, and fill in the existing converter charger already in the recreational vehicle.
Rv Generator Repair La Habra, CA
Room was a costs up there, and the inverters had particular air void requirements. The Generator has a sheet metal shadow separating it from the remainder of the compartment, so I chose to cut that shroud down 6" to obtain the additional room I required. I cut around the shroud, dropped it down, and placed pop rivets to hold it in area.
According to the Victron Manual, the inverters can be mounted horizontally or up and down, so I decided to place them horizontally on their sides on the wall surface. In doing this, I satisfied every one of the needed air gaps. The original wall was only" particle board, so to sustain the 70lbs that each of the inverters weigh, I included a piece of" plywood throughout the rear of the wall behind them.
Rv Refrigerator Repair Near Me La Habra, CA
Because we are chatting solar system, of program we required solar panels. There are lots of various options out there for solar panels; in the end I selected to go with Continuous Resources for a couple of various reasons.
One of my buddies has one that was split during installment, and it still worked well! Something I suched as concerning the certain panels I chose is that I can obtain the same specifications in a square or rectangular panel. In the long run, I selected all rectangles, yet had I intended to (or when I intend to) include even more panels, I can get the various shapes and make much better use my roof space.
Rv Repair And Service Near Me La Habra, CA
We had not slanted once, and 1 collection of the tilting brackets set you back greater than the full set of the Z brackets. So I went budget on the installing braces. A close friend of mine that assisted me mount a lot of the system showed me a great method to mount the panels.
We pierced pilot holes, put dicor in the opening, screwed them down and after that covered the base of the brace and bordering roof covering with dicor. The eternabond tape offered it an added layer of water seal, and secured the rubber from being tore if the steel Z brace occurred to wiggle or move in all.
It is essential to have a plan in place for the wiring. When you start dealing with reducing and crimping lugs onto the wires, it obtains extremely expensive, and you do NOT want to have to kink, reduce, and crimp once again. That will certainly cost you $5 or even more for every time you overestimate cord size and waste a cable lug.
Motorhome Service And Repair Near Me La Habra, CA
Since I was installing 2 inverters and 2 fee controllers, it was very important to maintain those 2 systems different. I made use of red and blue wire tags to identify electrical wiring so I wouldn't get them confused. I also used the exact same red and blue sticker labels on the elements themselves to help maintain points right.
Obtain a great collection of cutters and a stripper for heavy scale wiring. Hydraulic crimping tool. I was lucky adequate to have a good friend aiding me with the majority of the installation that had this kinking tool, and when he left, I had a hard time to locate a crimping device to end up the project that didn't involve simply beating the lugs with a hammer.
I got it off Amazon for less than $30, and it made making my links in between the panels much less complicated. It doesn't have to be super fancy, yet the capability to determine resistance/continuity and both AC and DC voltage is crucial.
Rv Repair In My Area La Habra, CA
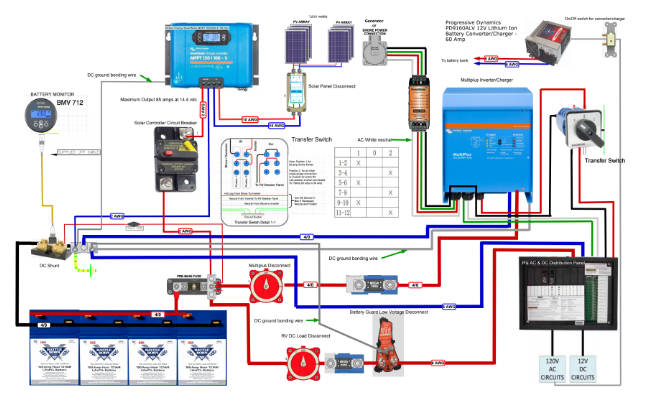
From Home Depot I obtained a water-proof electrical box about 8"x8"x6". I covered the entire bottom of package with dicor and screwed it down. La Habra Rv Repair Shops Near My Location. To complete the box, I applied a grain of dicor all the method around package. I drilled 5 openings into package: 4 x Tiny openings, one each for electrical wiring coming from the panels with climate evidence fits to maintain the elements out 1" opening in the bottom leading the cords via the roof into the wall surfaces of the motor home Inside the box the 10 AWG cords from the panels were spliced onto 6 AWG cords for its trip through the RV to the solar charge controllers Victron parts all work quite possibly together and share info.
In enhancement to every one of this circuitry, the Inverters and the Battery screen featured voltage sense and temperature sense cords that had to be connected to the battery bank as necessary. Let's begin with the solar circuit. I am running 6 x 200 watt panels configured right into 2 x 3 panel legs wired in series.
Motorhome Service And Repair Near Me La Habra, CA
I found it much more budget-friendly to run 2 different smaller sized controllers than 1 larger controller with the ability of handling the amount of power coming from the panels. Additionally, given that the 2 strings are running independent of each various other, if there is shade or lack of angle to the sunlight on 1 of the 2 strings, it will not impede the power production of the various other string.
Remember; once the panels remain in sunlight, they are creating power, so I made use of the circuit breakers in this placement to provide me the ability to separate them completely from the remainder of the system. From there the electrical wiring runs right into the solar charge controllers in the front compartment near the battery bank.
Once more the point is to not only secure, however to provide me a location to isolate the system if need be. The last leg of electrical wiring in the solar circuit goes from the breaker right into the positive and negative busbars that are straight connected right into the battery financial institution. Allow's keep choosing the DC (12 volt) system.
Motorhome Repair Shops La Habra, CA
A DC system is much more comparable to the sort of electrical system located in a vehicle. The RV's 12 volt system has its very own defense and control in position, so I did not change it any type of method; I simply powered it from the favorable and negative busbars from the battery bank.
OCRV Center
Address: 23281 La Palma Ave Yorba Linda, CA 92887Phone: (714) 909-1444
Email: [email protected]
OCRV Center
This component of the circuit can run exceptionally high quantities of electrical power depending on what you are powering, so this needs substantial security. From the Battery Financial institution, I ran significant 4/o circuitry right into a 400 amp fuse. This catastrophic failure fuse is meant to protect the electrical wiring in between the inverters and the battery bank.
Rv Service Repair Near Me La Habra, CAMotorhome Repair Service La Habra, CA
Rv Solar Installation La Habra, CA
Rv Plumbing Repair Near Me La Habra, CA
Rv Repair Services Near Me La Habra, CA
Motorhome Refrigerator Repair La Habra, CA
Rv Repair Service Near Me La Habra, CA
Rv Repair Services Near Me La Habra, CA
Rv Repair And Service Near Me La Habra, CA
Camper Ac Repair Near Me La Habra, CA
Rv Service And Repair Near Me La Habra, CA
Motorhome Repair Service La Habra, CA
Rv Repair Places Near Me La Habra, CA
Motorhome Repair Service La Habra, CA
Motorhome Generator Repair Near Me La Habra, CA
Motorhome Awning Repair La Habra, CA
Rv Service Repair Near Me La Habra, CA
Rv Solar Installation La Habra, CA
Rv Floor Repair Near Me La Habra, CA
Rv Repair Centers Near Me La Habra, CA
Best Rv Repair Near Me La Habra, CA
Rv Repair Centers Near Me La Habra, CA
Rv Solar Panel Installation La Habra, CA
Rv Plumbing Repair Near Me La Habra, CA
Motorhome Repair Shop La Habra, CA
Rv Repair Centers Near Me La Habra, CA
Rv Plumbing Repair Near Me La Habra, CA
Rv Repairs Near Me La Habra, CA
Rv Repair Centers Near Me La Habra, CA
Rv Service And Repair Near Me La Habra, CA
Motorhome Repair Shop La Habra, CA
Rv Ceiling Repair La Habra, CA
Rv Solar Installation La Habra, CA
Rv Generator Repair La Habra, CA
Motorhome Awning Repair La Habra, CA
Rv Repair Shops Near My Location La Habra, CA
Rv Plumbing Repair Near Me La Habra, CA
Rv Floor Repair Near Me La Habra, CA
Rv Delamination Repair Near Me La Habra, CA
Rv Floor Repair Near Me La Habra, CA
Rv Delamination Repair Near Me La Habra, CA
Rv Repair And Service Near Me La Habra, CA
Motorhome Repair Near Me La Habra, CA
Motorhome Repair Shop La Habra, CA
Motorhome Service And Repair Near Me La Habra, CA
Rv Generator Repair La Habra, CA
Motorhome Awning Repair La Habra, CA
Motorhome Awning Repair La Habra, CA
Rv Generator Repair La Habra, CA
Motorhome Service And Repair Near Me La Habra, CA
Rv Ceiling Repair La Habra, CA
Rv Refrigerator Repair Near Me La Habra, CA
Rv Repair Places Near Me La Habra, CA
Rv Repair Shops Near My Location La Habra, CA
Rv Service And Repair Near Me La Habra, CA
Rv Mechanics Near Me La Habra, CA
Rv Repair In My Area La Habra, CA
Rv Mechanics Near Me La Habra, CA
Rv Solar Installation La Habra, CA
Motorhome Refrigerator Repair La Habra, CA
Motorhome Refrigerator Repair La Habra, CA
Rv Repair In My Area La Habra, CA
Rv Repair In My Area La Habra, CA
Rv Floor Repair Near Me La Habra, CA
Rv Repair Places Near Me La Habra, CA
Rv Plumbing Repair Near Me La Habra, CA
Rv Refrigerator Repair Near Me La Habra, CA
Rv Generator Repair La Habra, CA
Rv Service Repair Near Me La Habra, CA
Motorhome Repair Near Me La Habra, CA
Motorhome Repair Service La Habra, CA
Rv Plumbing Repair Near Me La Habra, CA
Motorhome Awning Repair La Habra, CA
Rv Repair Shops Near My Location La Habra, CA
Rv Solar Panel Installation La Habra, CA
Rv Plumbing Repair Near Me La Habra, CA
Rv Solar Panel Installation La Habra, CA
Motorhome Generator Repair Near Me La Habra, CA
Finding A Good Seo Specialist La Habra, CA
Close To Seo Marketing Company La Habra, CA
Rv Repair Shops Near My Location La Habra, CA
OCRV Center
Table of Contents
- – Rv Solar Panel Installation La Habra, CA
- – OCRV Center
- – Rv Solar Panel Installation La Habra, CA
- – Rv Repair In My Area La Habra, CA
- – Rv Plumbing Repair Near Me La Habra, CA
- – Rv Generator Repair La Habra, CA
- – Rv Refrigerator Repair Near Me La Habra, CA
- – Rv Repair And Service Near Me La Habra, CA
- – Motorhome Service And Repair Near Me La Habr...
- – Rv Repair In My Area La Habra, CA
- – Motorhome Service And Repair Near Me La Habr...
- – Motorhome Repair Shops La Habra, CA
- – OCRV Center
Latest Posts
Best Supplemental Insurance For Seniors Tustin
Swamp Cooler Pad Replacement Valley Village
Toluca Lake Swamp Cooler Leak Repair
More
Latest Posts
Best Supplemental Insurance For Seniors Tustin
Swamp Cooler Pad Replacement Valley Village
Toluca Lake Swamp Cooler Leak Repair