All Categories
Featured
Table of Contents
- – Rv Roof Repair Fiberglass Irvine, CA
- – OCRV Center
- – Resealing Rv Roof Irvine, CA
- – Rv Roof Repair Service Near Me Irvine, CA
- – Epdm Rv Roof Repair Irvine, CA
- – Rv Roof Repair Near Me Irvine, CA
- – Rv Roof Repair Irvine, CA
- – Rv Roof Repair Service Near Me Irvine, CA
- – Rv Roof Leak Repair Near Me Irvine, CA
- – Rv Rubber Roof Repair Irvine, CA
- – Repair Rv Roof Irvine, CA
- – Roof Repair For Rv Irvine, CA
- – Roof Repair For Rv Irvine, CA
- – Class C Rv Roof Repair Irvine, CA
- – OCRV Center
Rv Roof Repair Fiberglass Irvine, CA
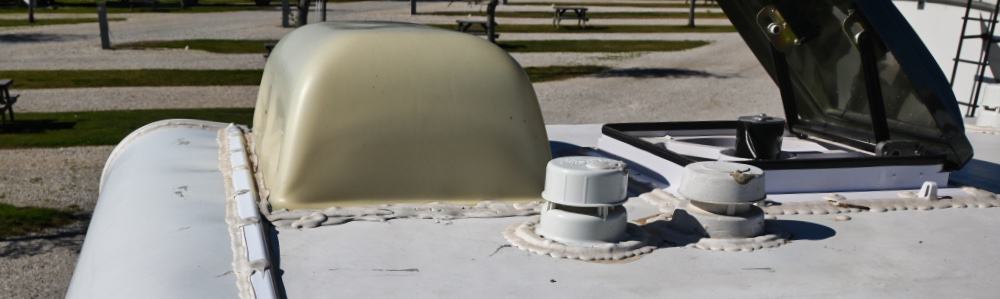
roof covering an excellent scrub down with some power cleaning! This will certainly guarantee that no dust or grime continues to be on your R.V.'s roof covering which can cause the new finishing to not stick effectively. Before using finishes it is essential to remove any loosened sealer around the R.V.'s vents and penetrations! If you don't do this after that applying new Recreational vehicle roofing securing can be difficult as there will already be a layer of R.V.
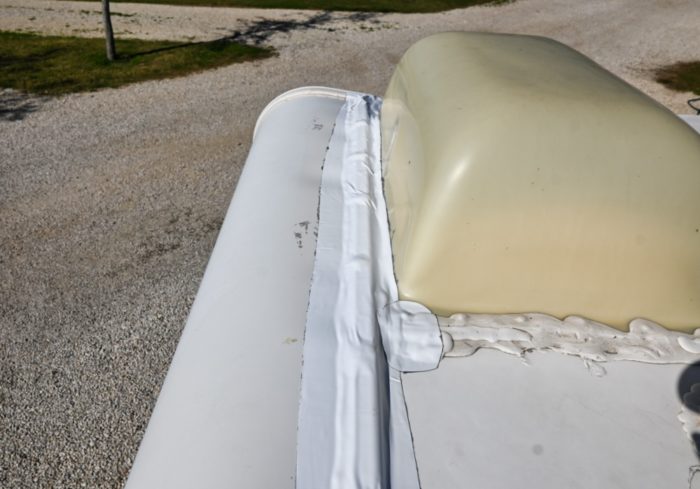
Tools you could make use of for this consist of paint scrappers blades grinders. Nonetheless you wish to see to it you do not harm any kind of sublayer of your motor home roofing system just strive removing the sealer and shed debris. If you have actually currently removed the loosened R.V. sealant that's around vents and penetrations, then it's time to utilize some recreational vehicle roofing tape over these locations! Use Hard Roofing Tape smoothly around all vents, skylights, infiltrations to seal out all moisture from getting in.
Resealing Rv Roof Irvine, CA
Challenging Roof Covering Tape is a rubber roof covering tape that sticks to your surface area and is 100% water-proof. The tape has a fabric mesh that layers can be put on to create a 100% water-proof membrane layer to your recreational vehicle roofing. Use Difficult Repair coating over the top of the tape fixing job.
Make certain to cover the tape and the surface around the tape up to 3 to 6 inches to make sure complete waterproofing When R.V.'s are made they usually use silicone sealant which which adheres badly and at some point lead to peeling off and fracturing triggering damage or water to enter. While it does assist safeguard your R.V.'s roof and penetrations from the components most motor home repairs come from using this kind of covering to secure your recreational vehicle roofing system.
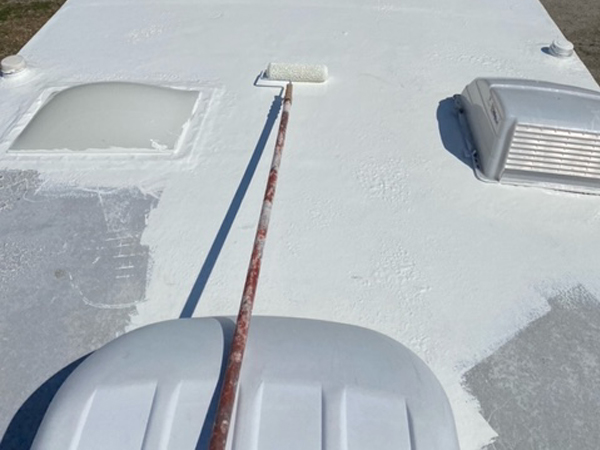
When Recreational vehicle roof covering repair is completed around the entire R.V.'s roof it's essential to make certain you utilize an extremely solid Recreational vehicle sealer that can hold up under all types of climate problems! The R.V.'s roofing system can take a pounding over time which is why it's essential to make use of the ideal Recreational vehicle sealant brand name! Prior to sealing and covering R.V.'s with TOUGH ROOFING Motor home is essential to tape off around the border of your R.V.'s roofing so you don't obtain sealer on any type of other component!
Rv Roof Repair Service Near Me Irvine, CA
If your RV is new or old then you need to take into consideration securing up any leakages with Difficult Roof covering recreational vehicle Coating before water damages makes it extra expensive! We recommend you check out our hard ROOF COVERING RV KITS and some of our guide video clips that explain this more extensive. If your looking for the most effective motor home Rubber Roofing Coating or Sealant then you located it.
Motor home roof treatment is a vital yet conveniently forgettable part of maintaining your RV. Routine maintenance can protect against wear and tear, leaks and various other issues that can cause comprehensive, expensive repair work. It is necessary for motor home proprietors to recognize what they need to do to keep their recreational vehicle roof covering clean and sealed.
These services can be costly and are normally not covered by your service warranty or insurance policy strategy. The sort of material a RV roofing system is made from depends upon the version. While most travel trailers have rubber roofings, clamshell trailers and motorhomes are probably to have fiberglass roofings. Rubber RV roofing systems are made from a thin weatherproof membrane layer extended over a wooden substratum.
Epdm Rv Roof Repair Irvine, CA
The white material is energy-efficient and can assist your RV remain great. TPO is susceptible to UV damages if left in the sun without the ideal maintenance. EPDM is just one of the most sturdy RV roof covering options. It is resistant to scratches and scuffs, and it can stand up to straight sunshine and heats.
Fiberglass roofs are made from artificial products and glass fibers. This molded item is made into sheets or panels that can be customized for the recreational vehicle. The advantages of fiberglass motor home roofs include their light-weight layout and sturdiness against rust and rot. Prolonged exposure to warmth can create thermal divides requiring extensive fixings or an entire replacement to take care of.
While the material can last a long period of time, aluminum has some drawbacks to consider it needs to be fastened, which can create joint failure, and the product can hide leakages. The roofing system is the frontline against the components, making it susceptible to damages. Lots of elements can create troubles with a RV roof covering, consisting of: Years when driving can damage RV roof coverings and create the material to break down.
Rv Roof Repair Near Me Irvine, CA
Sunlight, extreme temperature levels and rainfall can jeopardize the integrity of a RV roof covering and trigger more damage. Some of the most usual troubles with Recreational vehicle roofs consist of: If the roof covering product has holes or destruction, or the roof accessories are not appropriately secured, these locations can create a leakage.
Depending upon the state of the roof's tears and splits, you may need to finish a patch repair or replace the entire roofing. Pooled water and shade urge the development of mold and mildew and mold, which can be tough to clean up from a recreational vehicle roof covering. Resealing Rv Roof Irvine. Recreational vehicle roof coverings can oxidize throughout the years
Recreational vehicle roofs with inadequate water drainage have reduced areas that collect water from cleaning or rainfall. Deterioration can produce roofing system quality concerns that stop layers from sticking to the roof.
Rv Roof Repair Irvine, CA
Doing motor home roofing system upkeep regularly supplies numerous benefits: Though normal upkeep needs you to spend time and cash into cleaning and repairing your roofing system, you will certainly save much more over time. Upkeep assists your RV last longer by taking care of minor problems prior to they become significant problems. All types of weather can create deterioration on your roof covering.
Motor home roof maintenance currently can make it easier to market or trade in your RV in the future. You will require these devices and products: Roof sealant safeguards the roofing of your Motor home from harmful UV rays.
RVs that have an integrated ladder generally have a walkable roofing system. Follow the RV supplier's guidelines for the roof covering's weight restrictions. In addition, beware not to step on the roof covering cross competes and watch for barriers when on the recreational vehicle roofing for your safety and security. Particles, dirt and dust that collect on your motor home's roofing system, integrated with heat and dampness, can encourage mold development.
Rv Roof Repair Service Near Me Irvine, CA
Cleansing your RV roof numerous times a year eliminates the debris and prevents mildew from taking hold and triggering additional damage. Comply with these actions to clean your recreational vehicle's roof: Sweep debris off the roof, specifically in the areas around the roof covering fixtures. Utilize a hose and water to rinse off the roof covering.
You can use a cleaning item created for Recreational vehicles or make your own cleaner making use of products you currently carry hand (Resealing Rv Roof Irvine). If the dust and spots are embeded in, allow the cleaner rest for a few minutes. Rub the roof with a brush, relocating round activities. If needed, include more cleaner and scrub till the roof is tidy.
Safety is additionally a problem because waxes are slippery and can make walking on the roof covering dangerous. A RV fixing professional can use finishings, make repairs and replace areas of or the entire roof, relying on what your recreational vehicle's roofing requires. Whether your motor home's roof has issues or remains in top condition, sealing and covering routinely are advantageous.
This product has a moderate abrasive to get rid of the oxidation and can be buffed up until it radiates. A UV sealer or wax protects the RV roofing system from UV rays, as exposure to the sunlight can make the roofing system product fracture and leak. This sealer additionally makes the roofing shiny and prevents black streaks from developing on the walls.
Rv Roof Leak Repair Near Me Irvine, CA
Some recreational vehicle insurance plan anticipate a roof covering substitute every 10 to 15 years. EternaBond tape is one technique for motor home roof covering repair work. This tape covers small splits and roofing system and wall separations alike, producing a water tight seal that prevents water from getting right into your recreational vehicle. After reducing the tape to dimension, leave a big margin around the tear and push it right into location, guaranteeing the piece is laid flat against the surface.
KOA has even more than 500 campgrounds throughout The United States and Canada near historic cities and lovely landscapes. With greater than 55 years of experience, KOA gives a premier outdoor camping experience that satisfies every vacationer. This experience with outdoor camping encompasses taking care of a RV. KOA's helpful personnel are trained and well-informed in recreational vehicle upkeep ideal techniques, from the roofing system to the tires.
Long tale short, Progressive paid our entire initial Estimate - COMPLETELY. They took up until last week to do it. This is the worst insurance coverage claim we have actually had to manage. The client was really upset since they had Springtime Damage outdoor camping strategies, and we didn't recognize if we would certainly be able to obtain the repair work done in time because of all the delays.
Rv Rubber Roof Repair Irvine, CA
But he called Progressive and has to have been not-so-nice due to the fact that he obtained the adjustor's manager involved. When the one in charge male spoke with the consumer, he was playing it up huge. He said so as to get the repair services done ASAP so they could make their trip, we might purchase parts overnighted and they would certainly cover it.
It was difficult to the end. Without entering into all of it, we did the roof covering our way - the appropriate way - and they didn't require the adjustor ahead and evaluate it after tear-down. They permitted us to send out images which, certainly, revealed the damages left after destroying the original EPDM.
Repair Rv Roof Irvine, CA
Provided all the problem Progressive had actually provided us over this repair service, we planned to hang onto the recreational vehicle until we were ensured repayment of the last $1,542.75 they had actually kept for the roof covering repair services. When we called them they sent a screenshot of the demand for repayment to be issued, saying they "wished it would be adequate." Since we really liked this consumer and he did have plans, we let the RV leave the store on 3/30/18.
and really did not come ... and really did not come. When we called them once more, they claimed they 'd stop repayment and release a new one. We FINALLY got settlement 4/23/18. Obtained a one-line e-mail from the consumer yesterday: "Exactly how unsatisfactory has this process been." He's shopping for brand-new insurance coverage. Images of roof covering with new substratum, and after that finished.
Recreational vehicle roofing system fixing is extremely important. Perhaps you've discovered from experience that Motor home rubber roofings and tree branches don't blend.
It can survive temperatures from -50 F to +240 F without splitting. It can be strolled on, is flexible, and has great resistance to abrasion. As a result of its slow aging price in the sunlight, manufacturers commonly provide a 10-12 year guarantee on their EPDM rubber roof coverings. A lot of rubber roofings will see a lifespan of 20+ years.
Roof Repair For Rv Irvine, CA
Long tale short, Progressive paid our whole original Quote - IN FULL. The consumer was extremely dismayed because they had Springtime Break outdoor camping plans, and we didn't understand if we 'd be able to get the repair services done in time due to all the hold-ups.
He called Progressive and must have been not-so-nice because he obtained the adjustor's supervisor involved. When in charge male talked with the customer, he was playing it up huge. He stated in order to get the repairs done immediately so they might make their journey, we can get components overnighted and they would certainly cover it.
Roof Repair For Rv Irvine, CA
It was hard throughout. Without entering into all of it, we did the roofing system our method - the appropriate way - and they didn't call for the adjustor ahead and examine it after tear-down. They enabled us to send out photos which, obviously, showed the damage left after wrecking the initial EPDM.
Given all the trouble Progressive had provided us over this repair work, we intended to hang onto the recreational vehicle until we were guaranteed payment of the final $1,542.75 they had actually withheld for the roof repair work. When we contacted them they sent a screenshot of the request for repayment to be released, claiming they "wished it would be sufficient." Because we truly liked this consumer and he did have plans, we let the motor home leave the store on 3/30/18.
Class C Rv Roof Repair Irvine, CA
and didn't come ... and didn't come. When we contacted them once again, they said they 'd quit repayment and provide a brand-new one. We ultimately obtained payment 4/23/18. Obtained a one-line email from the consumer yesterday: "Exactly how unsatisfactory has this process been." He's looking for brand-new insurance coverage. Images of roofing with brand-new substratum, and afterwards finished.
Recreational vehicle roofing system repair is vitally important. Perhaps you have actually discovered from experience that RV rubber roofing systems and tree branches do not blend.
OCRV Center
Address: 23281 La Palma Ave Yorba Linda, CA 92887Phone: (714) 909-1444
Email: [email protected]
OCRV Center
Due to its slow-moving aging rate in the sun, suppliers typically offer a 10-12 year guarantee on their EPDM rubber roof coverings. A lot of rubber roofings will see a life-span of 20+ years.
Motorhome Roof Replacement Irvine, CARv Roof Maintenance Irvine, CA
Rv Roof Leak Repair Irvine, CA
Rv Roof Replacement Irvine, CA
Roof Repair For Rv Irvine, CA
Rubber Roof For Rv Irvine, CA
Rv Roof Replacement Irvine, CA
Epdm Rv Roof Repair Irvine, CA
Resealing Rv Roof Irvine, CA
Rubber Roof For Camper Irvine, CA
Rv Roof Repair Irvine, CA
Rv Roof Maintenance Irvine, CA
Rubber Roof For Camper Irvine, CA
Rv Roof Maintenance Irvine, CA
Rv Roof Leak Repair Irvine, CA
Motorhome Roof Replacement Irvine, CA
Rv Roof Maintenance Irvine, CA
Rubber Roof For Camper Irvine, CA
Rv Roof Repair Near Me Irvine, CA
Epdm Rv Roof Repair Irvine, CA
Rv Rubber Roof Maintenance Irvine, CA
Roof Repair For Rv Irvine, CA
Repair Rv Roof Irvine, CA
Rubber Roofing For Campers Irvine, CA
Rv Trailer Roof Repair Irvine, CA
Rv Slide Out Roof Repair Irvine, CA
Rv Roof Repair Near Me Irvine, CA
Rv Fiberglass Roof Repair Irvine, CA
Rv Slide Out Roof Repair Irvine, CA
Best Rv Roof Repair Irvine, CA
Rv Rubber Roof Maintenance Irvine, CA
Rubber Roof Installation Irvine, CA
Rv Trailer Roof Repair Irvine, CA
Replace Rv Roof Irvine, CA
Rubber Roof For Rv Irvine, CA
Rv Trailer Roof Repair Irvine, CA
Rubber Roof Installation Irvine, CA
Rv Roof Repair Near Me Irvine, CA
Rv Roof Replacement Irvine, CA
Motorhome Roof Replacement Irvine, CA
Rubber Roofing For Rv Irvine, CA
Rv Roof Repair Near Me Irvine, CA
Rv Roof Repair Fiberglass Irvine, CA
Rv Rubber Roof Replacement Irvine, CA
Rubber Roofing For Rv Irvine, CA
Rv Roof Repair Fiberglass Irvine, CA
Rv Fiberglass Roof Repair Irvine, CA
Rv Trailer Rubber Roof Repair Irvine, CA
Repair Rv Roof Leak Irvine, CA
Repair Rv Roof Leak Irvine, CA
Roof Repair For Rv Irvine, CA
Rubber Roofing For Rv Irvine, CA
Rv Roof Maintenance Irvine, CA
Epdm Rv Roof Repair Irvine, CA
Repair Rv Roof Irvine, CA
Rv Rubber Roof Repair Irvine, CA
Rubber Roof For Camper Irvine, CA
Motorhome Roof Replacement Irvine, CA
Replace Rv Roof Irvine, CA
Rubber Roof For Camper Irvine, CA
Rubber Roofing For Campers Irvine, CA
Rv Rubber Roof Repair Irvine, CA
Rv Roof Maintenance Irvine, CA
Roof Repair For Rv Irvine, CA
Rv Roof Repair Service Near Me Irvine, CA
Rv Fiberglass Roof Repair Irvine, CA
Rubber Roofing For Rv Irvine, CA
Resealing Rv Roof Irvine, CA
Rv Trailer Rubber Roof Repair Irvine, CA
Resealing Rv Roof Irvine, CA
Rv Roof Replacement Irvine, CA
Resealing Rv Roof Irvine, CA
Rv Trailer Roof Repair Irvine, CA
Rv Roof Repair Near Me Irvine, CA
Rubber Roofing For Campers Irvine, CA
Rv Roof Repair Service Near Me Irvine, CA
Rv Roof Repair Near Me Irvine, CA
Rubber Roof For Rv Irvine, CA
Near Me Seo Package Irvine, CA
Find Seo Services Pricing Irvine, CA
OCRV Center
Table of Contents
- – Rv Roof Repair Fiberglass Irvine, CA
- – OCRV Center
- – Resealing Rv Roof Irvine, CA
- – Rv Roof Repair Service Near Me Irvine, CA
- – Epdm Rv Roof Repair Irvine, CA
- – Rv Roof Repair Near Me Irvine, CA
- – Rv Roof Repair Irvine, CA
- – Rv Roof Repair Service Near Me Irvine, CA
- – Rv Roof Leak Repair Near Me Irvine, CA
- – Rv Rubber Roof Repair Irvine, CA
- – Repair Rv Roof Irvine, CA
- – Roof Repair For Rv Irvine, CA
- – Roof Repair For Rv Irvine, CA
- – Class C Rv Roof Repair Irvine, CA
- – OCRV Center
Latest Posts
Best Supplemental Insurance For Seniors Tustin
Swamp Cooler Pad Replacement Valley Village
Toluca Lake Swamp Cooler Leak Repair
More
Latest Posts
Best Supplemental Insurance For Seniors Tustin
Swamp Cooler Pad Replacement Valley Village
Toluca Lake Swamp Cooler Leak Repair