All Categories
Featured
Table of Contents
- – Rv Sofas Montclair, CA
- – OCRV Center
- – Rv Dinette Table Montclair, CA
- – Replace Rv Flooring Montclair, CA
- – Remodeling Rv Montclair, CA
- – Rv Sofas Montclair, CA
- – Rv Refrigerator Replacement Montclair, CA
- – Awnings For Trailers Montclair, CA
- – Rv Upholstery Montclair, CA
- – Rv Replacement Furniture Montclair, CA
- – Rv Couch Bed Montclair, CA
- – Remodeling Rv Montclair, CA
- – Rv Replacement Awnings Montclair, CA
- – Rv Couch Bed Montclair, CA
- – OCRV Center
Rv Sofas Montclair, CA
Low-cost traditional couches can be discovered at shops like IKEA and installed in your Recreational vehicle using L braces and a few screws or bolts. While we don't suggest this concept if you plan to use a seat belt while resting on the couch, those who just utilize their Rv couches while sitting still can conserve a rather dime by going this route.
This could entail hiring somebody to construct the couch for you or it might imply handling the jobs yourself. Regardless, you will have the ability to make something that completely matches your room and demands. Simply be prepared for a little added expense and/or time to go into the building and setup procedure.
Rv Dinette Table Montclair, CA
I approached the issue from the foot end of the bed. It was rather easy to change the fold-out foot areas. There are currently openings drilled, so all you need to do is back the screws out (after taking the nuts off) readjust the length, then re-bolt them.
It should have been a quite pricey option for the OP, however I prefer to do away with the electric things as unneeded, and have a functioning storage space area underneath. The take out it has now offers a wide double foot remainder yet the latching setting up is so badly made, it must have broken early.
The cord damaged at some time in the past, possibly as a result of the reality that the couch foot rest regarding be perfectly straightened for the pin to release. I want to remove the darn point ASAP, and a customized like you define would be fantastic ... Allow's dive in. One way to upgrade worn-out or hideous furnishings is to buy furniture that's especially developed for RVs, such as the RecPro brand jackknife couch or sofa bed, both pictured below. Both of these loveseats come in several various colors and can be acquired online and provided straight to you.
Replace Rv Flooring Montclair, CA
You can likewise acquire that hook to the flooring of your Motor home. You'll need to make certain any furnishings you add doesn't surpass your Motor home's weight restriction.
They weren't too tough to put with each other either. If you're refurbishing a motorhome, you will need to take seat belts into consideration if any passengers will certainly use the furnishings throughout travel. Some RV owners have actually bolted do it yourself couches to the walls or flooring with openings cut for seatbelts, however any alterations of this type would be at your own discretion and potential risk.
Remodeling Rv Montclair, CA
Also though it's not a sleeper sofa, we chose convenience was more vital to us considering that we rest on our sofa every day. Ikea is a favorite furniture resource for a great deal of RVers because of the big supply and style alternatives.
It likewise transforms to a bed and comes in 3 neutral colors: light gray, dark grey, and off-white. That fold out to a bed that will conveniently sleep 2 adults and features a storage compartment.
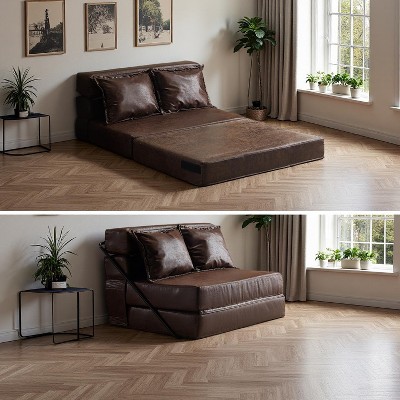
This 54 hide-a-bed loveseat from would certainly match the initial style of the majority of more recent campers and motorhomesbut at less than half the cost. And also, it includes a memory foam bed mattress rather than the common hide-a-bed mattress. If you're wanting to avoid the appearance of recreational vehicle factory-style style and create a more home-like ambience in your recreational vehicle, this 57 sleeper couch is the same idea but in a different design.
Futons are a fantastic replacement alternative since they tend to be far more low-cost than couches and are usually indistinguishable. This full-size futon can be found in 9 different shades, including neutral gray bed linen as well as numerous intense velour colors. If you require a futon to fit in a smaller sized room, this 64 velvet futon comes in several gorgeous shades.
Rv Sofas Montclair, CA

You may be asking yourself if the weight would be as well heavy for a Motor home. This sofa weighs 211 pounds with the bed mattress, making it only 20 extra pounds heavier than the majority of hide-a-bed Recreational vehicle couches.
Motor home proprietor Shannon McDonald reconfigured her space so that she still has both an eating booth and a sofa, but with more couch room. She changed her couch with this trundle daybed, after that made use of the stand from her original dining room table with a brand-new top and 2 smaller sized storage benches as seats.
Rv Refrigerator Replacement Montclair, CA
(It is available in great deals of different shades, too!) I acquired this stretch-to-fit slipcover to makeover our couch to better suit our decoration. Although I was initially doubtful that a slipcover could look excellent, this barely looked like a slipcover whatsoever. And the collection of "put grasps" I purchased to select it actually held it in position.
One idea for buying slipcovers: pay focus to the form of the arms. Some slipcovers are made to go over curved arms (like mine visualized above), whereas others are created straight arms. One typical complaint concerning recreational vehicle furnishings is that it's unpleasant for adults to sleep on specifically the beds that are made from dining cubicle pillows.
Awnings For Trailers Montclair, CA
Great deals of comfortable throw pillows bought from Ikea and make this a comfortable location to spend a wet day while camping. Motorhome owners Expense and Return of investment McGuire wanted a much more comfy option to their jackknife sofa, however given that the sofa base covered some of the RV's mechanical parts, they could not eliminate it completely.
All set to replace your old couch bed? I suggest dismantling and removing your furniture in items so it can easily fit through your Motor home door.
This is a significant impact on what you can replace your sofa bed with. This tends to be a bigger interest in getting rid of dining rooms. There are wonderful concepts for working about subjected cables and technicians in this short article. We enjoy sharing RV remodelings. Go down a web link to your completed motor home in the comments or share it with @RVinspiration on Instagram to be featured.
Rv Upholstery Montclair, CA
She handed off the web site to brand-new owners in 2022 to release a new service as an online entrepreneur trainer, yet she still assists as the blog site editor. Ashley invested 3 years living full-time in a 38-foot, 5th-wheel recreational vehicle with her hubby Josiah and their cat, Cat. Her favorite aspect of recreational vehicle life is the obstacle of discovering the best means to organize a space, and she enjoys seeing all the creative and smart means individuals develop to customize their Recreational vehicles.
Many thanks, Costs! We used a memory foam mattress topper when our little girl stuck with us, and she claimed it was comfy in this way. Once we relocated in full-time, however, any kind of storage space where it could fit is currently in operation. It was simply a little bit as well cumbersome to fit inside the sofa when it's done away with.
Rv Replacement Furniture Montclair, CA
I agree with you - if it wasn't for the surface being so unequal, this would not be such a trouble.
Places, such as Bunkhouse Motor Home, in RedBay Alabama do remodellings regularly and have many, lots of couches, recliners cabinets, and so on that they have actually secured of various other motor home's and TTs. Might be worth a see or at least a phone call ... I sleep on it as well and it draws! What ends up being the center part of the bed is way to soft. 1st option was a self blowing up outdoor camping pad put into a basic resting bag for enhancement convenience. Made a bed atop that mix. A renovation plus simple to store. 2nd soution was a thicker air matress.
And also, can be cold when the temps drop.i awals rest with my head toward the kitchen area as it feels as if it slopes down to the back of the instructor. Needless to claim, always trying to find something much better. Your option looks intriguing so I will certainly examine further. BTW, there isn't that much height space under the sofa.
Rv Couch Bed Montclair, CA
well, i came into time and cash and also some giveaways and have some new jobs to share. Got fed up with the 4 inch pillows crushing to 0 when sleeping and the general lack of comfort of the pleather covers ... so i figured i would certainly share the service. in my situation anyway the sunrader has a 6 foot couchbed that develops into a twin dimension bed ish when expanded.
When i opened it up it was exact suit virtually to the cushions from my sofa laid out in bed mode. its likewise 7 inches thick; a wonderful renovation from the 4 inch crush vulnerable ones. Now i discovered i would need to reduce them so i mapped off the appropriate cut line and obtained out the electrical bread blade.
Following I got a futon cover for dimension complete ... this is so that i have extra material to sew in to sub-divide the seat and back-rest paddings - thats en route. from an additional one of my preferred ebay.com sellers; a hubby and better half team that run a reclaimed motor home parts shop in S.E.
Its a great natural leather device with a flip down cup owner table constructed right into the center seat. Remodeling Rv Montclair. I have made a decision to put that on the other side of the motor home throughout from the initial sofa. I highly suggest these flip sofas for our rigs; they are excellent and have a hinge that turns the entire back-rest pillow over the leading and prolong it on the end making a bed; when in couch mode they have storage behind the back-rest for bed linens which is outstanding.
Remodeling Rv Montclair, CA
Currently the rig will have 2 substantial couches that fold up right into beds along with the rooftop bed above the taxicab. I prepare on setup this weekend break and some pictures.
Bradd & Hall uses a large option of motor home sofas for sale that will certainly fit completely in your Motorhome, Traveling Trailer, Fifth Wheel, or Destination Trailer. Our RV couches consists of brand names like Lambright and Suite. Whether you need a recreational vehicle sleeper couch or RV jackknife couch, we carry a variety of models that range in dimension and functions.
Rv Replacement Awnings Montclair, CA
The bigger versions consist of center consoles with cup holders and storage space. These Recreational vehicle recliner chairs are true wall huggers that just need three inches of clearance.
The normal-sized sofa will certainly occupy an edge of area, however, the additional seats is helpful when taking a trip with additional guests. The increased seats is convenient however comes with the cost of walking floorspace. Suite Dormie Sofas can be transformed right into a level area to put an air bed mattress on the top.
When i opened it up it was precise match practically to the cushions from my sofa outlined in bed setting. its additionally 7 inches thick; a wonderful enhancement from the 4 inch crush vulnerable ones. Now i seen i would certainly need to reduce them so i traced off the appropriate cut line and ventured out the electrical bread knife.
I have chosen to place that on the various other side of the RV throughout from the initial sofa. I highly suggest these flip couches for our rigs; they are wonderful and have a joint that turns the entire back-rest padding over the top and prolong it on the end making a bed; when in sofa setting they have storage behind the backrest for bedding which is remarkable.
Now the gear will have 2 massive sofas that fold up into beds along with the roof bed above the taxicab. I intend on setup this weekend break and some pics.
Bradd & Hall offers an expansive choice of RV sofas up for sale that will certainly fit flawlessly in your Motorhome, Travel Trailer, Fifth Wheel, or Location Trailer. Our motor home couches includes brands like Lambright and Vacation home. Whether you need a motor home sofa bed or motor home jackknife sofa, we lug a range of designs that range in dimension and features.
The larger variations include facility gaming consoles with cup owners and storage space. These Recreational vehicle reclining chairs are true wall surface huggers that just need three inches of clearance.
Rv Couch Bed Montclair, CA
OCRV Center
Address: 23281 La Palma Ave Yorba Linda, CA 92887Phone: (714) 909-1444
Email: [email protected]
OCRV Center
The normal-sized sofa will occupy an edge of room, nevertheless, the added seats is handy when taking a trip with extra visitors. The increased seating is practical but features the expense of strolling floorspace. Rental property Dormie Sofas can be transformed right into a level area to place an air mattress ahead.
Rv Sofas Montclair, CAReplacement Windows For Rv Montclair, CA
Remodeling Rv Montclair, CA
Replacement Windows For Campers Montclair, CA
Rv Refrigerator Replacement Montclair, CA
Rv Replacement Furniture Montclair, CA
Rv Sofa Sleeper Montclair, CA
Rv Dinette Booth Montclair, CA
Rv Carpet Installation Montclair, CA
Rv Chairs Montclair, CA
Rv Carpet Installation Montclair, CA
Motorhome Carpets Montclair, CA
Awnings For Trailers Montclair, CA
Awning Installation Montclair, CA
Awnings For Trailers Montclair, CA
Rv Sofa Sleeper Montclair, CA
Rv Floor Replacement Montclair, CA
Rv Interior Furniture Montclair, CA
Rv Refrigerator Replacement Montclair, CA
Rv Replacement Furniture Montclair, CA
Awning Installation Montclair, CA
Replacement Windows For Campers Montclair, CA
Rv Interior Furniture Montclair, CA
Rv Microwave Replacement Montclair, CA
Awnings For Trailers Montclair, CA
Awnings For Trailers Montclair, CA
Replacement Windows For Campers Montclair, CA
Rv Sofa Beds Montclair, CA
Rv Interior Furniture Montclair, CA
Rv Restoration Companies Montclair, CA
Rv Dinette Table Montclair, CA
Awning Installation Montclair, CA
Replacement Rv Windows Montclair, CA
Rv Sofa Beds Montclair, CA
Replacement Windows For Campers Montclair, CA
Replacement Windows For Campers Montclair, CA
Remodeling Rv Montclair, CA
Motorhome Carpets Montclair, CA
Rv Carpet Replacement Montclair, CA
Replacement Rv Windows Montclair, CA
Rv Dinette Booth Montclair, CA
Rv Chairs Montclair, CA
Rv Interior Furniture Montclair, CA
Rv Carpet Installation Montclair, CA
Rv Dinette Table Montclair, CA
Replacement Windows For Rv Montclair, CA
Replace Rv Flooring Montclair, CA
Motorhome Carpets Montclair, CA
Rv Restoration Companies Montclair, CA
Awnings For Rv Montclair, CA
Rv Sofas Montclair, CA
Rv Couch Bed Montclair, CA
Rv Upholstery Montclair, CA
Rv Replacement Furniture Montclair, CA
Rv Dinette Booth Montclair, CA
Rv Interior Remodel Montclair, CA
Rv Floor Replacement Montclair, CA
Replacement Windows For Campers Montclair, CA
Motorhome Carpets Montclair, CA
Rv Refrigerator Replacement Montclair, CA
Replace Rv Flooring Montclair, CA
Replacement Windows For Campers Montclair, CA
Rv Dinette Table Montclair, CA
Rv Dinette Booth Montclair, CA
Replacement Windows For Rv Montclair, CA
Rv Dinette Booth Montclair, CA
Motorhome Carpets Montclair, CA
Motorhome Carpets Montclair, CA
Awnings For Trailers Montclair, CA
Awnings For Rv Montclair, CA
Rv Interior Furniture Montclair, CA
Rv Carpet Installation Montclair, CA
Rv Interior Remodel Montclair, CA
Rv Interior Remodel Montclair, CA
Rv Dinette Booth Montclair, CA
Rv Sofas Montclair, CA
Rv Upholstery Montclair, CA
Replacement Rv Refrigerator Montclair, CA
In My Area Seo Optimization Services Montclair, CA
Finding A Good Local Seo Agency Montclair, CA
OCRV Center
Table of Contents
- – Rv Sofas Montclair, CA
- – OCRV Center
- – Rv Dinette Table Montclair, CA
- – Replace Rv Flooring Montclair, CA
- – Remodeling Rv Montclair, CA
- – Rv Sofas Montclair, CA
- – Rv Refrigerator Replacement Montclair, CA
- – Awnings For Trailers Montclair, CA
- – Rv Upholstery Montclair, CA
- – Rv Replacement Furniture Montclair, CA
- – Rv Couch Bed Montclair, CA
- – Remodeling Rv Montclair, CA
- – Rv Replacement Awnings Montclair, CA
- – Rv Couch Bed Montclair, CA
- – OCRV Center
Latest Posts
Employee Benefits Center Aliso Viejo
Payroll And Services Villa Park
Senior Citizens Insurance Rancho Santa Margarita
More
Latest Posts
Employee Benefits Center Aliso Viejo
Payroll And Services Villa Park
Senior Citizens Insurance Rancho Santa Margarita