All Categories
Featured
Table of Contents
- – Plumber Toilet Repair Del Mar Heights, CA
- – Black Mountain Plumbing
- – Gas Line Plumber Del Mar Heights, CA
- – Plumber Shower Installation Del Mar Heights, CA
- – Water Heater Installers Del Mar Heights, CA
- – Gas Line Plumber Del Mar Heights, CA
- – Bathroom Plumber Del Mar Heights, CA
- – Local Plumber Del Mar Heights, CA
- – Affordable Plumber Near Me Del Mar Heights, CA
- – Shower Repair Near Me Del Mar Heights, CA
- – Residential Plumbing Repair Near Me Del Mar ...
- – Local Plumber Del Mar Heights, CA
- – Local Plumber Del Mar Heights, CA
- – Water Line Repair Del Mar Heights, CA
- – Plumbers In Del Mar Heights, CA
- – Water Filtration Services Near Me Del Mar He...
- – Black Mountain Plumbing
Plumber Toilet Repair Del Mar Heights, CA
Black Mountain Plumbing
9909 Hibert Street Suite E San Diego, CA 92131(858) 536-4161
Black Mountain Plumbing
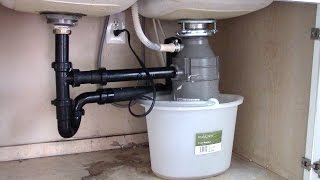
This step includes mindful positioning to the sink drainpipe, attaching water lines, and making sure a leak-free arrangement for efficient waste disposal. Compliance with regional building ordinance and safety laws is vital when you install a garbage disposal. These standards remain in location to make certain the safety and security and effectiveness of electric and pipes installations in domestic setups.
When planning to set up a waste disposal unit, it is necessary to understand what the process requires. Before the real setup, a preliminary analysis is essential. This includes examining the existing sink configuration, ensuring there's enough space under the sink for the disposal, and figuring out if any kind of added plumbing or electrical alterations are required.
This involves separating it from the source of power, separating it from the sink, and meticulously removing any linked pipes. Mounting a waste disposal unit usually starts with setting up the system according to the supplier's directions. This involves connecting the mounting ring, guaranteeing appropriate alignment, and securing it to the underside of the sink.
Gas Line Plumber Del Mar Heights, CA
This should be carried out in conformity with electric safety and security requirements and might require the skills of an electrical contractor if straight electrical wiring is required. Connecting the disposal to the plumbing system is a critical step. This consists of connecting the drain lines, ensuring the dishwasher drain is linked if applicable, and ensuring all connections are tight and leak-free.
You can install the installing brace that will hold up your disposal. Following make the electric and dish washer links. You can install the disposal and hook it up to the drain pipes. Transform off the electric power at the fuse box or breaker. Plumber Shower Installation Del Mar Heights. Using flexible pliers disconnect the drainpipe trap from the disposal waste discharge tube.
Plumber Shower Installation Del Mar Heights, CA
Raise the disposal somewhat and loosen up the lower placing ring by pressing or drawing wrenches or screwdriver to the left up until the disposal is without installing assembly. Lay the disposal on its side and remove the electrical cover plate. Loose the environment-friendly ground screw and get rid of the wire adapters.
Loosen up screws on the electric clamp port and remove wires from the disposal. To remove the existing placing hardware, loosen the 3 placing screws. Pry the breeze ring off with a screwdriver and get rid of the old mounting assembly, then press the old sink flange up via the sinkhole. Utilize a screwdriver or putty blade to carefully scuff all old putty from the edge of the sinkhole.
Water Heater Installers Del Mar Heights, CA
Drop the new sink flange into the drainpipe opening and press it right into place. Putting a weight such as your disposal in addition to the sink flange will help hold the sink flange in area while installing the sink flange to the sink. To avoid scraping your sink or the flange, put a towel in between the sink surface and the weight from under the sink.
Next off, eliminate the loose knockout plug from inside of the disposal. Get rid of the plate on the base of the disposal to expose the circuitry and use cord connectors to attach the cords from the disposal to the matching wires from the power supply.
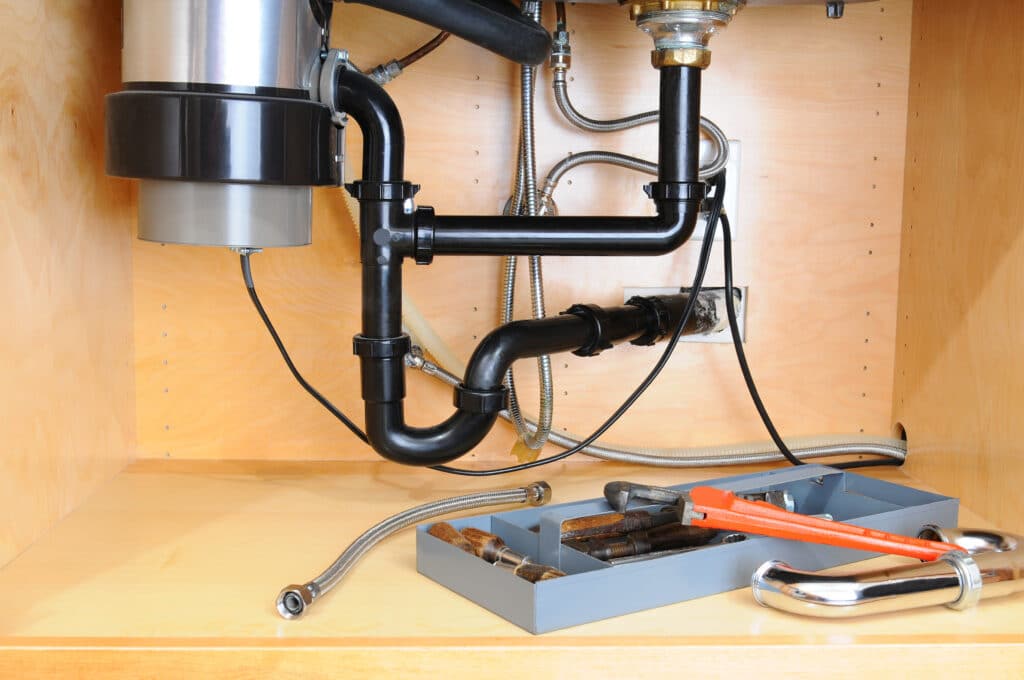
Change the plate, to cover the cables. All evolution designs install similarly, though there are a few extra steps with the cover control, more on that particular momentarily. Initially, for all designs various other than cover control, hang the disposal by aligning the 3 mounting tabs with the slide up ramps on the placing ring.
The disposal will certainly now hang by itself. Rotate the disposal so that the discharge tube is aligned with the drain trap.
Gas Line Plumber Del Mar Heights, CA
If you are attaching the disposal to a dishwashing machine it may be attached through an air void. Use a hose pipe clamp to attach the drainpipe pipe to the dishwasher inlet. Since whatever is mounted and in placement, lock the disposal to the sink mounting assembly using the special wrench that featured the unit.
For the cover control design, the sink baffle was established at the factory. If it has actually been gotten rid of, it would certainly be a lot simpler to place it now before installing the unit. Hang the disposal by aligning the three placing tabs with the slide up ramps onto the placing ring.
The disposal will certainly now hang by itself. Turn the disposal so that the discharge tube is aligned with the drainpipe trap.
Bathroom Plumber Del Mar Heights, CA
If you are attaching the disposal to a dish washer it may be attached to an air space. Utilize a pipe clamp to connect the drainpipe hose to the dishwashing machine inlet. Now that whatever is mounted and ready, lock the disposal to the sink installing assembly making use of the unique wrench that included the device.
It snaps into location on 2 of the 3 screws on the installing assembly. For all models, you should evaluate for leaks at the sink flange dishwashing machine tailpipe and mounting assembly links. Transform on the electric breaker to check its procedure.
Local Plumber Del Mar Heights, CA
The trash disposal is a kitchen appliance that assists in the disposal of food waste. It is necessary to have a functioning waste disposal unit. If your waste disposal unit quits working, you can conveniently replace it. Below are fundamental actions to assist you change a waste disposal unit on your own. The very first step in replacing a rubbish disposal is disconnecting the pipelines from your old unit and eliminating them from your sink or counter top.
Disconnect the power source from the trash disposal. This serves as the electric house cover.
The most vital point to keep in mind is that a lot of them need to obtain replaced. The initial step in replacing a harmed placing assembly is to determine if there is any damage to the mounting ring and flange. It will require to be changed if it has been broken or split.
Affordable Plumber Near Me Del Mar Heights, CA
To do this, shut off the power to your rubbish disposal and turn on the water to your sink. If needed, turn off the supply of water to your dishwasher and various other sinks to protect against flooding if something falls short. Loosen up the nut holding back a sink flange with a wrench or pliers so it can be removed from its placing place.
With a flathead screwdriver, eliminate old sink flanges by pushing in on them with your fingers while they are still affixed to their mounting equipment. Depending upon what kind of waste disposal unit you have actually installed in your kitchen area, there may be greater than one sort of flange, however a lot of will certainly have 2 screws that secure them to their placing holes in an electrical outlet.
Making use of a big wrench, loosen the bolts holding the sink flange to the sink. When you have actually disconnected your sink flange and the drain line, remove any kind of particles inside it.
Shower Repair Near Me Del Mar Heights, CA
Add a couple of decreases of dishwashing fluid into this location to help loosen up any type of staying product from inside the pipeline. This enables any loosened product to go through easier. Connect the brand-new install. Move the rubber gasket over all-time low of your brand-new sink flange first, then a second steel flange, functioning in reverse order this time around.
With one hand holding the setting up in place, utilize the various other to tighten up the screws against the reduced flange. Below are the ideas for the last setup action. Safeguard the replacement disposal onto the placing ring: The installing ring is a huge ring that rests below your sink and holds the disposal.
Residential Plumbing Repair Near Me Del Mar Heights, CA
Reattach the electrical cables: The electrical wires for your disposal are located under a rubber cap affixed with Velcro strips. Reattach them to their corresponding terminals on your brand-new device, after that reconnect them to their equivalent terminals on your electric box.
Make certain no water leaks from connection factors bordering the new device while running. Utilize a line of Teflon pipeline joint compound or a strip of string seal tape to secure any kind of little leaks you observe.
Local Plumber Del Mar Heights, CA
If essential, trim the discharge tube. There's a substantial probability that the discharge tube won't be the appropriate length to attach to the ground plumbing shutoff if you have actually updated to a bigger disposal or among a different kind. The good news is, this is a simple repair service; mark the location on the tube where it ought to straighten with the drainpipe pipe and make use of a hacksaw to trim it to size.
When you are made with the installation, transform the waste disposal unit breaker to the "On" position. Return to the kitchen area and switch on the disposal with the switch. Pay interest to the sound. No humming, grinding, or too much resonance ought to be present. See to it there are no devices, screws, or various other loose products in the sink that might spoil what you simply repaired.
Call a certified plumbing technician to look at the brand-new disposal if it is making odd sounds or does not seem to be working properly. There can be an issue with the device's internal systems. If you are searching for expert and trustworthy plumbing solution in Newburgh, NY, you can rely on Polar Plumbing, Heating & Cooling.
Local Plumber Del Mar Heights, CA
Setting up a brand-new waste disposal unit calls for mindful factor to consider of numerous elements to preserve optimum kitchen performance. Consulting with a neighborhood plumbing technician helps house owners decide about disposal selection and installment needs. Motor dimension directly affects grinding capacity and performance. Requirement disposals range from a third to one horsepower, with greater power units dealing with harder food waste extra effectively.
Measurements should account for plumbing links and electrical demands. Many disposals call for committed electrical circuits - Plumber Shower Installation Del Mar Heights. Professional setup by a local plumbing technician consists of appropriate electrical connections and safety and security verification.
Water Line Repair Del Mar Heights, CA
Different versions employ various grinding mechanisms. Constant feed units run while water runs, while batch feed designs need covers for operation. Each kind provides distinctive benefits depending upon usage patterns. Multi-stage grinding provides more complete waste processing. Advanced systems minimize strain on plumbing while improving performance. Professional installment optimizes grinding efficiency with appropriate adjustment.
The preliminary acquisition price represents just part of the complete installment price. Specialist installment, necessary adjustments, and potential upgrades affect overall expenses. Quality installation avoids future repair work expenses.
A trash disposal that hums or seems like steel grinding on steel is a foolproof sign that it's time to replace it. A waste disposal that isn't working right can be revived with a straightforward fix. Here are a couple of points to attempt prior to running to the hardware store and buying a brand-new device.
Utilize a flashlight to look for things that might have obtained trapped, and order them with a set of tongs or needle-nose pliers. Second, look beneath the rubbish disposal and locate the hole directly in the. Utilizing a hex wrench or a basic Allen wrench, turn the wrench to and fro to by hand reset the electric motor.
Plumbers In Del Mar Heights, CA
If none of these techniques work, it's time to go in advance and change the waste disposal. Unlike various other home renovation projects that might require a range of special tools, to change a garbage disposal, you'll mostly require tools you most likely currently have on hand.
It's a great idea to take an image of your existing garbage disposal so you can make certain you're replacing each item in the ideal order. Open the box with the new garbage disposal inside. Verify that it contains every one of the items that are the same to the old system.
As with any kind of home improvement job, keep safety in mind. Head to your main circuit breaker and shut off power to the unit. There might be a breaker dedicated to the waste disposal unit, or you could have to close off power to the whole kitchen. You'll now be able to begin working without the risk of electrical shock.
Water Filtration Services Near Me Del Mar Heights, CA
The discharge tube is the pipe that extends from the side of the disposal and extends to the ground plumbing. Get rid of the discharge pipeline by loosening up any kind of screws or nuts with a screwdriver. After that, remove the old filter to the waste disposal. Locate the slim steel ring on the old trash disposal.
Different the disposal from the power supply by transforming the unit over and locating the faceplate for the electrical housing. Get rid of the sink flange by wiggling or pressing below the flange and raising it out from the top.
Black Mountain Plumbing
Address: 9909 Hibert Street Suite E San Diego, CA 92131Phone: (858) 536-4161
Email: [email protected]
Black Mountain Plumbing
Apply plumbing professional's putty to the bottom of the brand-new sink flange. Considering that you do not want the brand-new flange to change while you're setting up the brand-new trash disposal, ask an assistant to securely push down on it while you're working.
Plumbing Installation Del Mar Heights, CAWater Leak Repair Del Mar Heights, CA
Best Plumbing Del Mar Heights, CA
Residential Plumbing Services Near Me Del Mar Heights, CA
Local Plumber Del Mar Heights, CA
Plumber For Clogged Toilet Near Me Del Mar Heights, CA
Garbage Disposal Installation Del Mar Heights, CA
Plumber Toilet Repair Del Mar Heights, CA
Local Plumbing Near Me Del Mar Heights, CA
Kitchen Plumbing Del Mar Heights, CA
Affordable Plumbing Near Me Del Mar Heights, CA
Gas Line Plumber Del Mar Heights, CA
Plumber For Clogged Toilet Near Me Del Mar Heights, CA
Water Line Repair Del Mar Heights, CA
Plumbing Installation Services Del Mar Heights, CA
Plumber For Clogged Toilet Near Me Del Mar Heights, CA
Water Filtration Services Near Me Del Mar Heights, CA
Water Leak Repair Del Mar Heights, CA
Plumber For Clogged Toilet Near Me Del Mar Heights, CA
Residential Plumbing Repair Near Me Del Mar Heights, CA
Plumber Toilet Repair Del Mar Heights, CA
Garbage Disposal Installation Del Mar Heights, CA
Local Plumber Del Mar Heights, CA
Garbage Disposal Installation Del Mar Heights, CA
Plumbing Installation Del Mar Heights, CA
Plumber Shower Installation Del Mar Heights, CA
Kitchen Plumbing Del Mar Heights, CA
Kitchen Plumbing Del Mar Heights, CA
Plumbing Installation Services Del Mar Heights, CA
Plumber For Clogged Toilet Near Me Del Mar Heights, CA
Shower Repair Near Me Del Mar Heights, CA
Bathroom Plumber Del Mar Heights, CA
Plumber For Clogged Toilet Near Me Del Mar Heights, CA
Plumber For Clogged Toilet Near Me Del Mar Heights, CA
Plumbers In Del Mar Heights, CA
Local Plumbing Near Me Del Mar Heights, CA
Residential Plumbing Services Near Me Del Mar Heights, CA
Plumber Shower Installation Del Mar Heights, CA
Best Plumber Del Mar Heights, CA
Plumbers In Del Mar Heights, CA
Plumber Shower Installation Del Mar Heights, CA
Residential Plumbing Services Near Me Del Mar Heights, CA
Shower Repair Del Mar Heights, CA
Gas Line Plumber Del Mar Heights, CA
Affordable Plumbing Near Me Del Mar Heights, CA
Plumbing Installation Near Me Del Mar Heights, CA
Water Line Repair Del Mar Heights, CA
Kitchen Plumbing Del Mar Heights, CA
Shower Repair Del Mar Heights, CA
Water Leak Repair Del Mar Heights, CA
Plumber For Clogged Toilet Near Me Del Mar Heights, CA
Affordable Plumbing Near Me Del Mar Heights, CA
Near Me Plumber Del Mar Heights, CA
Residential Plumbing Repair Near Me Del Mar Heights, CA
Local Plumbing Near Me Del Mar Heights, CA
Local Plumber Del Mar Heights, CA
Best Plumber Del Mar Heights, CA
Local Plumber Del Mar Heights, CA
Near Me Plumber Del Mar Heights, CA
Plumbing Installers Near Me Del Mar Heights, CA
Plumber Shower Installation Del Mar Heights, CA
Affordable Plumbing Near Me Del Mar Heights, CA
Kitchen Plumbing Del Mar Heights, CA
Gas Line Plumber Del Mar Heights, CA
Affordable Plumber Near Me Del Mar Heights, CA
Residential Plumber Del Mar Heights, CA
Plumber For Clogged Toilet Near Me Del Mar Heights, CA
Plumbing Installation Del Mar Heights, CA
Plumbing Installation Near Me Del Mar Heights, CA
Plumber Company Near Me Del Mar Heights, CA
Plumber Toilet Repair Del Mar Heights, CA
Plumbing Installation Near Me Del Mar Heights, CA
Water Leak Repair Del Mar Heights, CA
Plumbing Installation Del Mar Heights, CA
Plumbers In Del Mar Heights, CA
Local Plumber Del Mar Heights, CA
Shower Repair Del Mar Heights, CA
Plumber Shower Installation Del Mar Heights, CA
Residential Plumber Del Mar Heights, CA
Plumbing Installation Services Del Mar Heights, CA
Finding A Seo Expert Del Mar Heights, CA
Finding A Local Seo For Law Firms Del Mar Heights, CA
Black Mountain Plumbing
Table of Contents
- – Plumber Toilet Repair Del Mar Heights, CA
- – Black Mountain Plumbing
- – Gas Line Plumber Del Mar Heights, CA
- – Plumber Shower Installation Del Mar Heights, CA
- – Water Heater Installers Del Mar Heights, CA
- – Gas Line Plumber Del Mar Heights, CA
- – Bathroom Plumber Del Mar Heights, CA
- – Local Plumber Del Mar Heights, CA
- – Affordable Plumber Near Me Del Mar Heights, CA
- – Shower Repair Near Me Del Mar Heights, CA
- – Residential Plumbing Repair Near Me Del Mar ...
- – Local Plumber Del Mar Heights, CA
- – Local Plumber Del Mar Heights, CA
- – Water Line Repair Del Mar Heights, CA
- – Plumbers In Del Mar Heights, CA
- – Water Filtration Services Near Me Del Mar He...
- – Black Mountain Plumbing
Latest Posts
Slab Plumbing Leak Miramar Ranch North
Torrey Hills Emergency Plumbing Service
24 Hour Plumber Near Me North Clairemont
More
Latest Posts
Slab Plumbing Leak Miramar Ranch North
Torrey Hills Emergency Plumbing Service
24 Hour Plumber Near Me North Clairemont